

Installing outdoor lighting transforms a home’s curb appeal, improves safety, and extends usable outdoor space into the evening. Whether lighting a pathway, highlighting landscape features, or adding security fixtures, the process involves basic electrical work that most homeowners can tackle with the right preparation. This guide walks through planning, wiring, and mounting outdoor lights using low-voltage and line-voltage systems. Some installations require permits and electrical expertise, this article clarifies when to call a licensed electrician and when a DIYer can proceed confidently.
Table of Contents
ToggleKey Takeaways
- Installing outdoor lighting enhances curb appeal, improves safety, and extends your usable outdoor space into the evening with either low-voltage or line-voltage systems.
- Start with a detailed layout plan by walking your property at dusk to identify dark zones and mark fixture locations, cable runs, and power sources before beginning the installation process.
- Low-voltage systems (12V or 24V) are safer, don’t require permits in most areas, and are ideal for pathway lights and decorative fixtures, while line-voltage systems (120V) need permits and professional expertise for security lights and high-mounted fixtures.
- Always call 811 before digging, turn off power at the breaker before any electrical work, and ensure GFCI protection is installed on all outdoor outlets to prevent shock hazards.
- Test your entire outdoor lighting system at dusk after installation, and address common issues like dim lights (voltage drop), no power (loose connections), or water intrusion by resealing junction boxes with silicone.
Planning Your Outdoor Lighting Layout
A successful outdoor lighting project starts with a layout plan that balances function, safety, and aesthetics. Homeowners should walk the property at dusk to identify dark zones, tripping hazards, and architectural features worth highlighting.
Low-voltage systems (12V or 24V) are ideal for pathway lights, garden spotlights, and decorative fixtures. They’re safer to install, don’t require conduit in most jurisdictions, and allow for easier repositioning. A transformer steps down standard 120V household current to low voltage and typically mounts near an outdoor GFCI outlet.
Line-voltage systems (120V) deliver brighter output for security lights, floodlights, and fixtures mounted high on walls or eaves. These installations require weatherproof junction boxes, GFCI protection, and often a permit. If the project involves running new circuits from the breaker panel, hiring a licensed electrician is the safer choice.
Draw a scaled sketch of the property, marking fixture locations, cable runs, and the power source. Measure distances to calculate cable length, add 10-15% for routing around obstacles and making connections. Note any underground utilities: call 811 for a free locating service before digging.
Essential Tools and Materials You’ll Need
Tools:
- Wire strippers and lineman’s pliers
- Voltage tester (non-contact or multimeter)
- Drill/driver with masonry and wood bits
- Spade or trenching shovel for burying cable
- Screwdrivers (flathead and Phillips)
- Tape measure and pencil
- Level
- Fish tape (if running cable through walls)
Materials:
- Outdoor light fixtures (rated for wet or damp locations per NEC standards)
- Low-voltage landscape cable (12/2 or 14/2 for low-voltage: 12/2 or 14/2 NM-B or UF-B for line voltage)
- Transformer (for low-voltage systems: sized for total wattage)
- Weatherproof wire connectors or heat-shrink butt connectors
- Conduit (PVC Schedule 40 or rigid metal for line-voltage burial, as required by code)
- Junction boxes (weatherproof, NEMA-rated)
- Mounting hardware (often included with fixtures)
- Silicone caulk (for sealing wall penetrations)
- GFCI outlet or breaker (if not already present)
Safety Gear:
- Safety glasses
- Work gloves
- Hearing protection (when drilling masonry)
- Insulated gloves (for electrical work)
Low-voltage cable doesn’t require conduit in most areas but should be rated for direct burial if running underground. Line-voltage cable must be UF-B (underground feeder) and buried at code-required depths, typically 12 inches for conduit-protected cable and 18-24 inches for direct-burial UF-B, depending on local code.
Safety Precautions Before You Begin
Electrical work carries real risk. Before touching any wiring, turn off power at the breaker and verify it’s off with a voltage tester. Never assume a switch alone disconnects power, test the circuit.
GFCI protection is mandatory for all outdoor outlets and fixtures per the National Electrical Code. If the existing outlet or circuit lacks GFCI, install a GFCI outlet, breaker, or an inline GFCI device before proceeding.
Check local codes and permit requirements. Many jurisdictions require permits for line-voltage outdoor installations, particularly if adding new circuits or running cable through walls. Low-voltage systems often don’t require permits, but it’s wise to confirm.
Buried cable safety: Always call 811 at least two business days before digging. Striking an underground utility line can cause injury, service outages, or costly repairs. Mark cable runs with caution tape or tracer wire for future reference.
Work in dry conditions. Wet hands, damp ground, and rain increase shock risk. If installing fixtures on ladders or at heights, use a stable, level surface and consider a helper for steadying and handing tools.
Step-by-Step Installation Process
Wiring and Connecting Your Fixtures
For low-voltage systems:
- Mount the transformer near a GFCI-protected outlet, typically 12-24 inches above ground. Most transformers come with a photocell or timer: follow manufacturer instructions for programming.
- Run landscape cable from the transformer to fixture locations. Lay cable in a shallow trench (3-6 inches deep) or secure it along fences or structures with cable staples. Avoid sharp bends that can damage conductors.
- Make connections using waterproof wire connectors or heat-shrink butt connectors. Strip 1/2 inch of insulation, twist conductors together, secure with connector, and seal. Many low-voltage fixtures use quick-connect clips that pierce cable insulation, align them carefully to avoid poor contact.
- Daisy-chain fixtures along the cable run, following the transformer’s total wattage limit. For runs longer than 100 feet or with multiple fixtures, use a hub method (multiple cables from the transformer) to reduce voltage drop.
- Test the circuit before burying cable. Plug in the transformer and check each fixture. Dim lights indicate voltage drop: shorten the run, increase wire gauge (e.g., 12-gauge instead of 14-gauge), or add a second cable.
For line-voltage systems:
- Turn off power at the breaker and verify with a voltage tester.
- Install a weatherproof junction box at the power source (often tapping an existing outdoor outlet or fixture). Ensure it’s rated for wet locations and properly sealed.
- Run UF-B cable through conduit (if required) or bury it at code depth. Trench neatly, avoiding tree roots and sharp rocks.
- Strip cable sheathing carefully, leaving conductors intact. Connect black to black (hot), white to white (neutral), and green or bare copper to ground using wire nuts rated for outdoor use. Wrap connections with electrical tape for extra protection.
- Mount fixtures to junction boxes using gaskets or foam seals to prevent water infiltration. Secure all connections inside the box before attaching the fixture.
- Restore power and test each fixture. If a fixture doesn’t light, recheck connections and verify the bulb is seated properly.
Mounting and Positioning Lights
Proper mounting ensures fixtures stay secure and perform as intended.
Wall-mounted fixtures:
- Mark mounting holes with a level and tape measure. For symmetry, measure from a reference point (doorframe, corner, etc.).
- Drill pilot holes. Use a masonry bit for brick or concrete and a wood bit for siding. Install anchors if fastening to masonry.
- Feed cable through the back of the fixture or a knockout hole. Secure the fixture with mounting screws, then seal any gaps with silicone caulk.
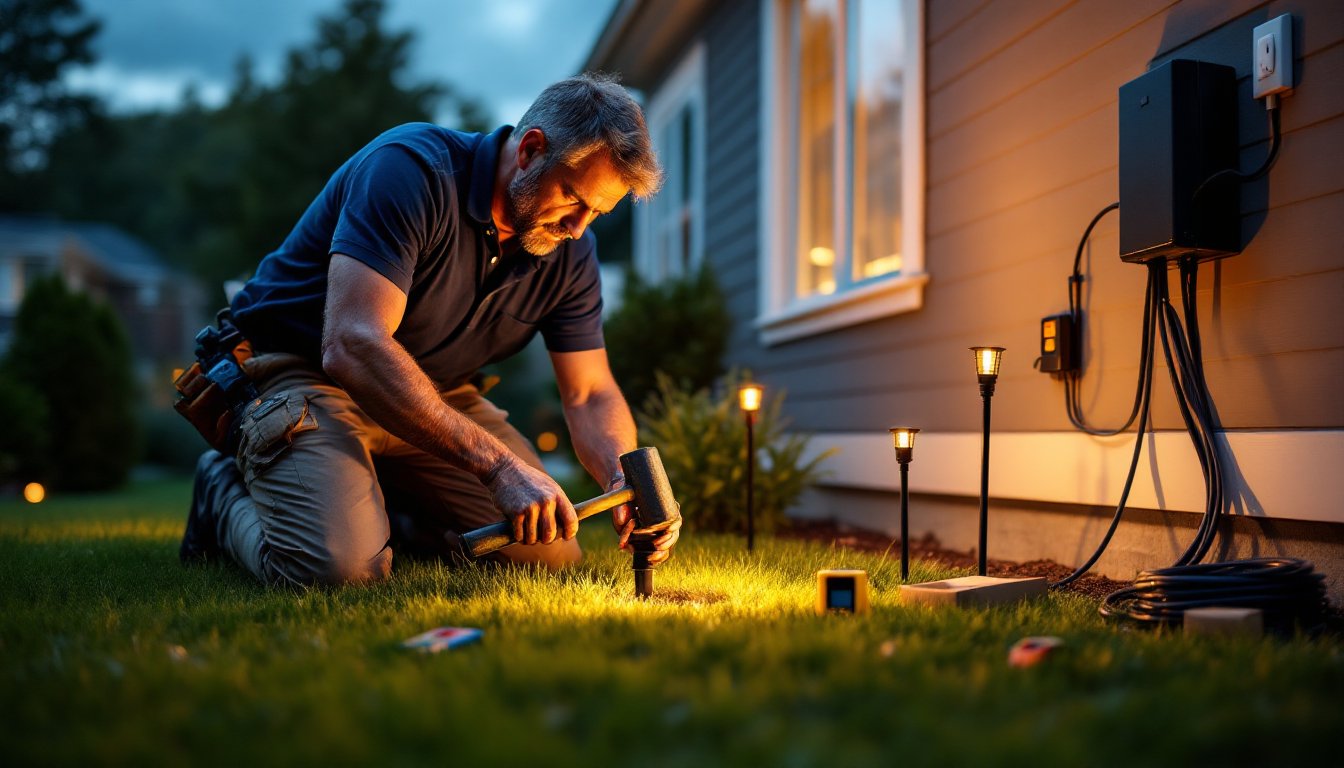
Ground-stake lights:
- Position stakes in soft soil using a rubber mallet. Avoid pounding too hard, which can crack plastic housings.
- Aim fixtures at focal points (trees, walkways, architectural details) and adjust angles after dark for best effect.
Post or column lights:
- Set posts in concrete if not using existing structures. Dig holes 1/3 the post height and let concrete cure for 24-48 hours before mounting fixtures.
- Run cable through the post center or in conduit alongside it. Cap the post top and seal penetrations.
Deck and step lights:
- Recessed fixtures require careful placement to avoid joists or structural members. Mark cutouts, drill starter holes, and use a jigsaw for clean edges.
- Ensure fixtures are rated for the installation location (damp vs. wet). Seal edges with caulk to prevent moisture from rotting wood.
Testing and Troubleshooting Your Outdoor Lights
After installation, test the entire system at dusk to evaluate light distribution and identify issues.
Common problems:
- Dim or flickering lights: Check for loose connections, voltage drop on long runs, or undersized wire. Upgrading to a larger gauge cable or adding a second transformer run often solves this.
- No power to fixtures: Verify the transformer or breaker is on, GFCI hasn’t tripped, and all connections are secure. Use a multimeter to test voltage at the fixture.
- Water in junction boxes: Reseal connections with silicone and ensure boxes are installed level or tilted slightly down to shed water.
- Lights stay on or don’t respond to timer/photocell: Replace the sensor or check programming. Dirt or nearby light sources can interfere with photocells.
Ongoing maintenance:
Clean fixtures twice a year to remove dirt, cobwebs, and debris that reduce light output. Check connections annually and replace bulbs or LEDs as needed. LED fixtures offer longer lifespans and lower energy costs but may require compatible transformers or dimmers.
If troubleshooting reveals faulty wiring behind walls or at the breaker, call a licensed electrician. Outdoor lighting should enhance safety, not compromise it.
With a solid plan, the right materials, and attention to code, installing outdoor lighting is a manageable DIY project that pays dividends in safety, security, and evening enjoyment. Homeowners who start with low-voltage systems often gain the confidence to tackle more complex line-voltage projects down the road. Either way, the result is a well-lit property that’s both functional and welcoming after dark.