
Outdoor LED strip lighting has shifted from a novelty to a practical workhorse for homeowners tackling everything from deck upgrades to landscape accents. Unlike bulky fixtures, these flexible strips tuck under railings, wrap around pergola beams, and outline pathways with minimal visual clutter. They’re energy-efficient, low-voltage, and, when spec’d correctly, capable of surviving years of rain, snow, and UV exposure. But not all LED strips are built for the elements. A strip rated for indoor closets will fail outdoors in a single season, while a properly sealed strip with the right power supply can handle harsh weather without flickering. This guide walks through what to look for, where to install them, and how to wire them so they last.
Table of Contents
ToggleKey Takeaways
- LED strip lighting outdoor solutions provide energy-efficient, continuous illumination for decks, pathways, and architectural accents with minimal visual clutter compared to traditional fixtures.
- Always verify IP ratings—IP65 is the baseline for most outdoor applications, while IP67 or IP68 are necessary for areas exposed to heavy moisture or submersion.
- Avoid voltage drop on runs exceeding 16 feet by using 24V systems, separate power feeds, or dual power supplies to maintain consistent brightness across the entire length.
- Proper surface preparation and weatherproofing of all connections using heat-shrink tubing or potted junction boxes are essential to prevent corrosion and multi-season failure.
- LED strip lighting costs only pennies per night to operate (typically 3–7 watts per foot), with a rated lifespan of 30,000–50,000 hours that translates to 20+ years of use for homeowners.
Why LED Strip Lights Are Perfect for Outdoor Spaces
LED strips solve problems that traditional outdoor lighting can’t. They deliver continuous, shadow-free illumination along irregular surfaces, deck steps, fence tops, planter edges, without the gaps left by spaced-out fixtures. Their low profile means they highlight architecture without becoming the focal point.
From a practical standpoint, most outdoor-rated LED strips run on 12V or 24V DC, which is safer to handle than line voltage and easier to extend across long runs. They draw minimal power, typically 3 to 7 watts per foot, so a 50-foot run costs pennies per night to operate. That efficiency adds up over outdoor entertaining seasons.
Durability is another advantage. Quality strips use epoxy or silicone encapsulation to protect diodes and circuitry from moisture, dust, and physical impact. Unlike incandescent rope lights that heat up and degrade outdoors, LEDs stay cool and maintain consistent color temperature for 30,000 to 50,000 hours. For a homeowner, that translates to years before needing replacements.
Flexibility matters when wrapping posts, following curved soffits, or lining garden beds. Most strips bend around corners without special connectors, and many can be cut at marked intervals (usually every 2 to 4 inches) to fit exact dimensions. This adaptability beats rigid fixtures in almost every retrofit scenario.
Key Features to Look for in Outdoor LED Strip Lights
Not every LED strip belongs outdoors. Indoor strips lack sealed housings and corrode within weeks when exposed to rain or dew. Outdoor-rated strips require specific certifications and construction.
Voltage and wattage come first. 12V strips are easier for DIYers to wire and widely available, while 24V strips experience less voltage drop on runs longer than 30 feet, making them better for expansive decks or perimeter lighting. Check the wattage per foot, higher output (5–7W/ft) suits task lighting like stair treads, while lower output (2–4W/ft) works for ambient accents.
Color temperature affects mood and visibility. 3000K warm white mimics incandescent bulbs and suits entertainment areas. 4000K neutral white provides clearer visibility for walkways and security zones. RGB or RGBW strips offer color-changing effects, useful for holiday lighting or themed events, but they require compatible controllers and cost more upfront.
LED density matters for smooth, continuous light. Strips with 60 LEDs per meter produce even illumination without visible dots. Lower densities (30 LEDs/m) work for indirect applications like under-deck soffit lighting, but they’ll look spotty when viewed directly.
IP Ratings and Weather Resistance
The IP (Ingress Protection) rating tells you exactly what a strip can survive. It’s a two-digit code: the first digit rates dust protection (0–6), the second rates moisture protection (0–8).
- IP65: Sealed with silicone coating, resistant to water jets and splashes. Suitable for covered patios, soffits, or pergolas where direct rain is minimal.
- IP67: Fully encased, submersible up to 1 meter for 30 minutes. Good for ground-level landscape lighting or areas with heavy rain runoff.
- IP68: Continuous submersion rated. Necessary for fountain lighting, pond edges, or in-ground installations.
For most residential outdoor projects, deck railings, eaves, fences, IP65 is the baseline. Anything lower will fail. If the strip sits in a location that pools water or gets hosed down during cleaning, step up to IP67.
Check the power supply’s IP rating separately. Many DIYers install a weatherproof strip but use an indoor power supply in an exposed junction box. The supply should match or exceed the strip’s rating, or be housed in a weatherproof enclosure rated NEMA 3R or better.
Creative Ways to Use LED Strip Lighting Outdoors
LED strips excel in applications where traditional fixtures feel clunky or impractical.
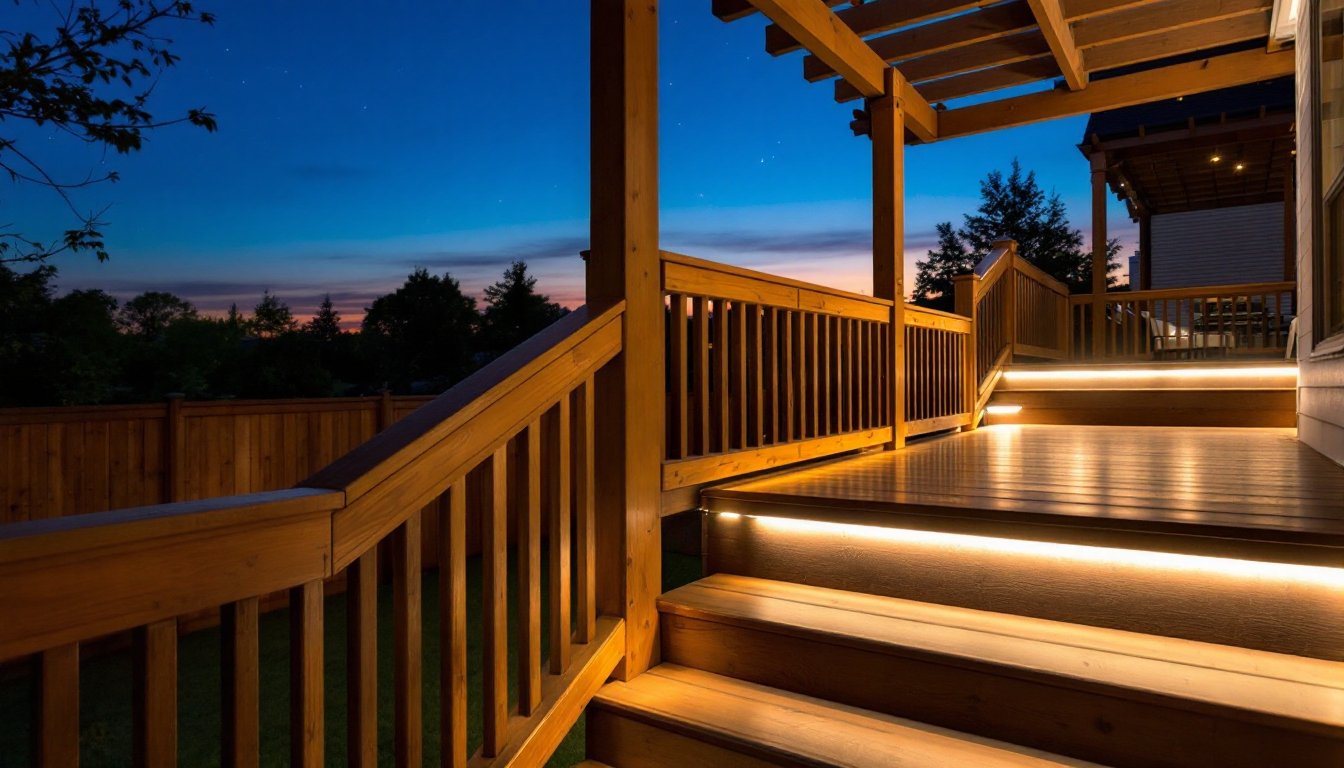
Under-deck and stair lighting improves safety and extends usability after dark. Mounting strips under the nosing of each tread or along stringer boards eliminates tripping hazards without harsh downlighting. Use aluminum channels with frosted diffusers to protect the strip and create a finished look.
Railing and fence accents define boundaries and add visual interest. Run strips along the bottom rail or cap rail of deck railings, or tuck them into routed grooves for a cleaner install. On horizontal fence slats, mount strips vertically between boards to create a glowing panel effect.
Pergola and gazebo lighting transforms covered outdoor rooms. Wrap strips around beams, or install them in a cove along the inside perimeter of a pergola roof. This provides ambient light without glare, ideal for dining or conversation areas.
Pathway and landscape edging guides foot traffic and highlights plantings. Stake strips along garden bed edges or mount them on the back of low retaining walls. For in-ground pathways, use IP67-rated strips in aluminum channels rated for foot traffic.
Architectural highlighting brings out texture on stone, brick, or wood siding. Graze light upward from the base of a wall or downward from eaves to emphasize material and shadow. Keep the strip at least 6 inches from the surface to avoid hot spots.
Pool and water feature lighting requires IP68-rated strips and compliance with local electrical codes. Most jurisdictions require low-voltage lighting within 10 feet of pool edges, and all connections must be made with waterproof heat-shrink connectors or potted junction boxes. When in doubt, consult a licensed electrician, water and electricity don’t forgive mistakes.
Installation Tips for Long-Lasting Outdoor LED Strips
Proper installation separates multi-year performance from a one-season failure.
Surface prep is critical. LED strips ship with 3M adhesive backing, but it bonds only as well as the surface it’s stuck to. Clean mounting surfaces with isopropyl alcohol and allow them to dry completely. On porous materials like raw wood, apply a coat of primer first, let it cure, then mount the strip. For metal or vinyl, ensure there’s no residue from cleaners or release agents.
Use aluminum channels whenever possible. Channels protect the strip from physical damage, improve heat dissipation, and create a professional appearance. They also accommodate frosted or clear diffusers that soften individual LED dots. Channels come in surface-mount, recessed, and corner configurations, pick the profile that fits your application.
Plan for voltage drop. On 12V strips, voltage drop becomes noticeable beyond 16 feet, causing the far end to dim. Solutions include:
- Running separate power feeds every 16 feet
- Using a higher-voltage 24V system
- Installing power supplies at both ends of a long run (requires parallel wiring)
Test brightness before final mounting to confirm even output across the entire length.
Weatherproof all connections. Factory-sealed strips often have bare wire leads or non-sealed connectors. Use heat-shrink tubing with adhesive lining or silicone-filled wire nuts on every splice. Exposed copper corrodes in weeks outdoors, causing flicker or total failure.
Route power supplies properly. Low-voltage DC supplies still need protection. Mount them in a weatherproof electrical box (plastic “while-in-use” covers work well), or place them indoors near an exterior wall and run low-voltage wire through a conduit gland. Never leave a power supply sitting exposed on a deck or under a bush.
Secure the strip beyond adhesive alone. For overhead or vertical runs, supplement adhesive with stainless steel mounting clips every 12 inches. Adhesive weakens in heat or cold: clips ensure the strip stays in place through temperature swings.
Safety note: Always wear safety glasses when cutting or handling rigid aluminum channels. Use gloves when working with sharp channel edges, and turn off power at the breaker before making any connections, even on low-voltage systems.
Smart Control Options and Energy Efficiency
Basic LED strips run on a plug-in timer, but modern controls add flexibility and efficiency.
Dimmers allow brightness adjustments for different activities, full output for tasks, 30% for ambient background. Look for dimmers rated for LED loads: older incandescent dimmers cause flicker or damage.
Smart controllers integrate with Wi-Fi systems like Alexa, Google Home, or Apple HomeKit. They enable scheduling, color changes (on RGB strips), and remote control from a phone. Most require a compatible hub or use Bluetooth for direct pairing. Installation is straightforward: the controller sits between the power supply and the strip, usually with screw terminals or plug connectors.
Motion sensors and photocells automate operation. A dusk-to-dawn photocell ensures lights turn on at sunset and off at sunrise without manual intervention. Motion sensors work well for security or infrequently used pathways, reducing runtime and saving energy.
Energy costs remain low even with nightly use. A 30-foot run of 5W/ft strip draws 150 watts total. At $0.13/kWh (US average), running it 6 hours per night costs about $3.50 per month. Over 50,000 hours of rated life, that strip will last roughly 22 years at that usage rate, far longer than any incandescent or halogen equivalent.
Solar-powered options exist but come with trade-offs. Solar LED strips rely on battery-stored energy, which limits brightness and runtime. They work for accent lighting in areas without electrical access, but don’t expect output or reliability comparable to hardwired systems.
Conclusion
Outdoor LED strip lighting delivers versatility and efficiency that traditional fixtures can’t match, but only when installed with the right materials and attention to detail. Prioritize IP ratings, plan for voltage drop, and weatherproof every connection. Done correctly, these strips will light up decks, pathways, and architectural features reliably for years, turning an evening outdoor space into a practical, usable extension of the home.